Có gì mới trong Nextjs 13? (phần 2)

- Published on

Tiếp tục với Có gì mới trong Nextjs 13, trong bài viết này chúng ta sẽ cùng tìm hiểu các nội dung sau:
1. Parallel Routes and Interception
Trong bản cập nhật 13.3, nextjs đã giới thiệu dynamic conventions mới giúp chúng ta implement các routing cases nâng cao hơn đó là: Parallel Routes và Intercepting Routes.
Parallel Routes
Parallel Routes cho phép chúng ta render đồng thời hoặc có điều kiện 1 hoặc nhiều page trong cùng 1 layout.
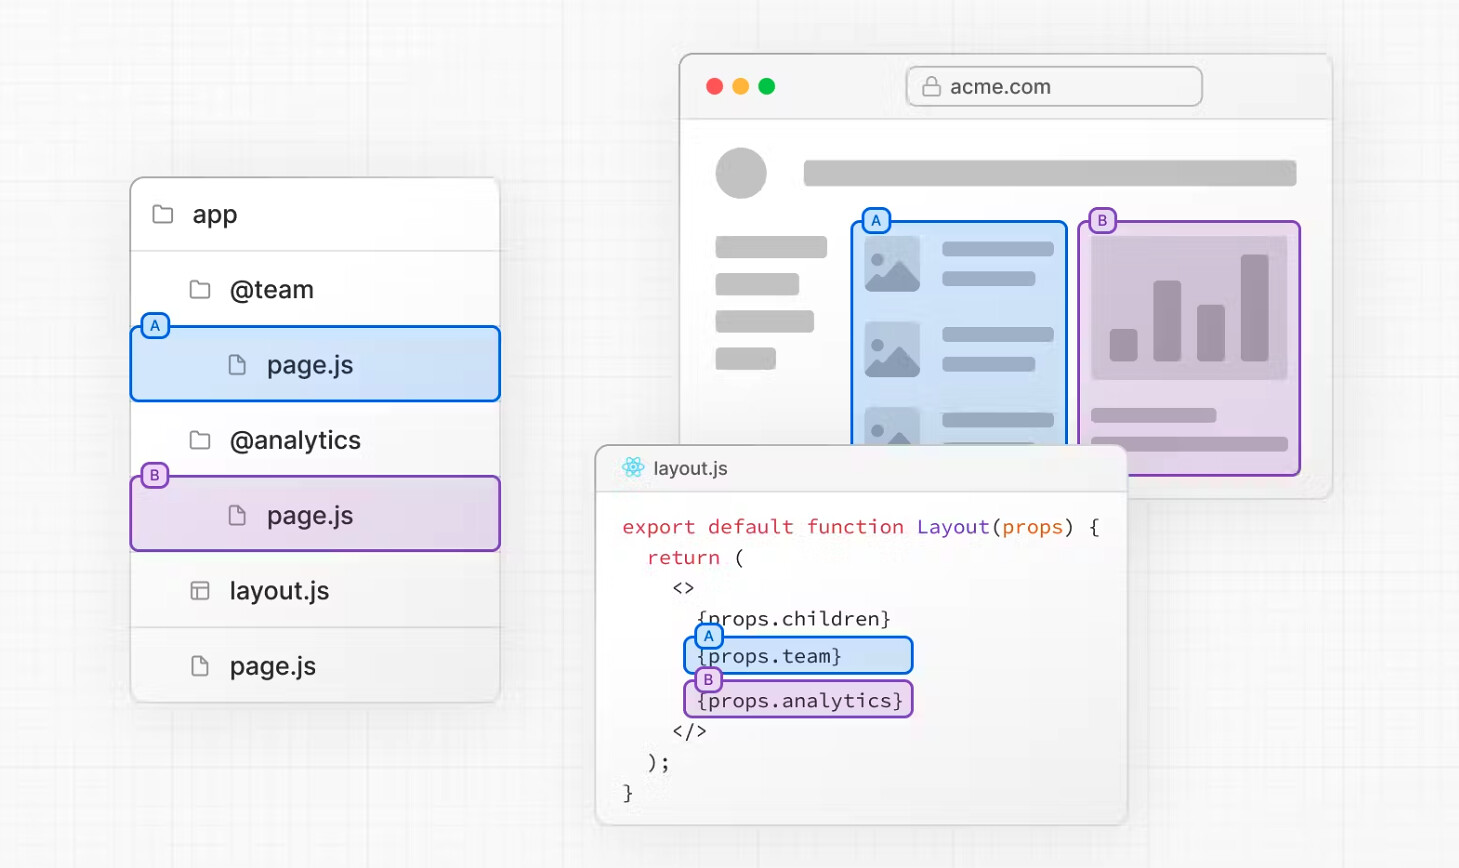
Ví dụ, chúng ta có thể render đồng thời Team và Analytic Page trong cùng 1 layout:
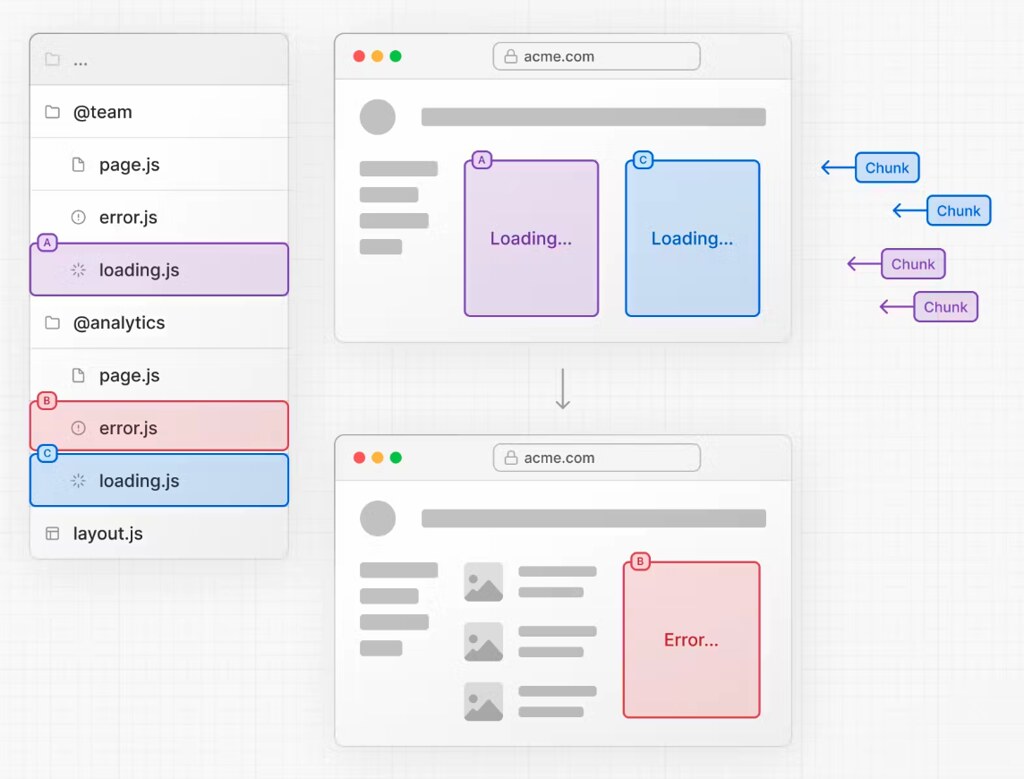
Ưu điểm của Parallel Routing đó là cho phép định nghĩa các state một cách độc lập cho từng route như Loading, error, ... . Chúng cũng sẽ được stream độc lập => Tăng trải nghiệm người dùng.
Ví dụ minh hoạ @team và @analytics có state và được stream độc lập:
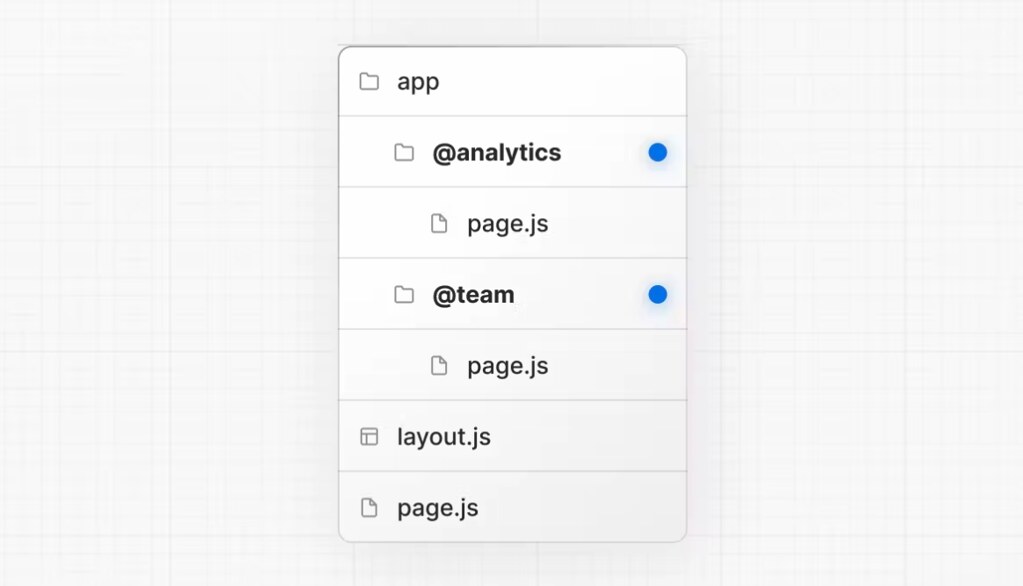
Convention của Parallel Routes khá đơn giản. các slots sẽ được đặt tên có dạng @folder. Các Slots sẽ được pass vào layout cùng level như các props.
Ví dụ về file structure 2 slots @analytics và @team:
Với folder structure trên, app/layout,js sẽ nhận @analytics và @team slots props và sẽ render chúng cùng với children prop:
app/layout.tsx
export default function Layout(props: {
  children: React.ReactNode
  analytics: React.ReactNode
  team: React.ReactNode
}) {
  return (
    <>
      {props.children}
      {props.team}
      {props.analytics}
    </>
  )
}
Intercepting Routes
Intercepting Routes cho phép chúng ta hiển thị nội dung của 1 route mà không cần thay đổi sang context khác.
Để hiểu rõ hơn thì mình sẽ làm 1 ví dụ theo cấu Folder structure như sau:
src
├── app
│   ├── intercepting
│   │   ├── (..)post
│   │   │   ├── page.tsx
│   │   ├── layout.tsx
│   │   ├── page.tsx
│   ├── post
│   │   ├── page.tsx
│   ├── layout.tsx
│   ├── page.tsx
├── component
│   ├── Modal.tsx
Đây sẽ là kết quả thu được:
Chúng ta sẽ có 2 Page chính: Intercepting và Post. Intercepting page sẽ chứa button để navigate sang page Post, và sẽ sử dụng chức năng Intercepting routes của nextjs 13 để hiển thị Modal Fake Post ( chính là (..)post trong folder intercepting ) thay vì load page Post. Khi nhấn ra ngoài Modal, sẽ back về page Intercepting và ẩn Modal.
(..) là convention của Intercepter Route.
Convention
- (.) to match segments on the same level
- (..) to match segments one level above
- (..)(..) to match segments two levels above
- (...) to match segments from the root app directory
Implement code
src/app/Post
  const Post = () => {
    return <div className="min-h-screen">This is a Post</div>;
  };

  export default Post;
src/app/intercepting/layout.tsx
  import React, { PropsWithChildren } from "react";

  const layout = ({ children }: PropsWithChildren) => {
    return (
      <div className="min-h-screen flex flex-col items-center justify-center gap-4">
        <div className="bg-green-400">This is intercept layout</div>
        <div>{children}</div>
      </div>
    );
  };

  export default layout;
src/app/intercepting/page.tsx
  import Link from "next/link";
  import React from "react";

  const Intercepting = () => {
    return (
      <div className="border-red-400 border p-2">
        <div className="mb-4">This is Intercepting page</div>
        <Link
          href="/post"
          className="bg-blue-500 h-10 flex flex-row items-center justify-center p-3 rounded-md text-white"
        >
          Go to post
        </Link>
      </div>
    );
  };

  export default Intercepting;
src/app/intercepting/(..)post
  import Modal from "@/components/Modal";
  import React from "react";

  const PostFake = () => {
    return (
      <Modal>
        <div className="text-red-100">PostFake inside intercepting</div>
      </Modal>
    );
  };

  export default PostFake;
2. Custom route Handlers
Trong Nextjs 12, để implement các API thì chúng ta sẽ khai báo trong folder pages/api. Để phân biệt các method khi sử dụng API theo nextjs 12 chúng ta thường làm như sau:
import type { NextApiRequest, NextApiResponse } from 'next'

export default function handler(req: NextApiRequest, res: NextApiResponse) {
  if (req.method === 'POST') {
    // Process a POST request
  } else {
    // Handle any other HTTP method
  }
}
=> Nhược điểm: cần thêm bước validate request method trước khi xử lý tiếp.
Từ version Nextjs 13.2, chúng ta có thể định nghĩa các API trong file được đặt tên là route.js|ts bên trong App folder.
app/api/route.ts
import { NextResponse } from 'next/server'

export async function GET() {
  const res = await fetch('https://data.mongodb-api.com/...', {
    headers: {
      'Content-Type': 'application/json',
      'API-Key': process.env.DATA_API_KEY,
    },
  })
  const data = await res.json()

  return NextResponse.json({ data })
}
Supported HTTP Methods
Route Handlers sẽ hỗ trợ các HTTP methods: GET, POST, PUT, PATCH, DELETE, HEAD, và OPTIONS. Nếu không hỗ trợ methods được gọi thì nó sẽ tự trả về lỗi 405 Method Not Allowed. Chúng ta sẽ không cần validate manually nữa.
Extended NextRequest and NextResponse APIs
Next.js extends native Request và Response ( Interface của Fetch API ) với NextRequest và NextResponse để cung cấp một cách thuận tiện và đáp ứng được những use case nâng cao hơn.
TypeScript Warning: mặc dù Response.json() là valid, nhưng hiện tại native TypeScript types sẽ hiển thị lỗi, bạn có thể thay thế bằng NextResponse.json() cho typed responses.
3. Server Actions (alpha)
Server Action là một chức năng rất hữu ích từ version 13.4. Với Server Action chúng ta không cần tạo các file route.js|ts để tạo các API Endpoint. Thay vào đó Server Action sẽ được sử dụng trực tiếp trong Server Component hoặc Client Component.
Nếu Server Action được sử dụng cùng với form trong 1 Server Component thì form đó sẽ hoạt động mà không cần đến Javascript.
Để sử dụng được Server Action thì cần enable trong next.config.js file
module.exports = {
  experimental: {
    serverActions: true,
  },
}
Ví dụ đơn giản về sử dụng Server Action với form:
export default function CourseComments() {
  async function addCommentToCourse(comment, courseId) {
    'use server'

     await saveComment({comment, courseId});
  }

  return(
     <form action={addCommentToCourse}>
       <button type="submit">Add Comment</button>
     </form>
  )
}
Trong ví dụ trên CourseComments là một Server Component, addCommentToCourse sẽ được thực thi khi nhấn vào button Add Comment ngay cả khi disable JS trên browser.
Ví dụ với Client Component không sử dụng <form/>:
add-comments.js
'use server'

import { addCommentToCourse } from '@/data/course'

export async function addComment(data, courseId) {
  const response = await addCommentToCourse(data, course);
  return response;
}
course-comment.jsx
'use client'

import { useTransition } from 'react'
import { addComment } from '@/actions/add-comment';

export default function CourseComment() {
  let [isPending, startTransition] = useTransition()

  return (
    <button onClick={() => startTransition((comment, courseId) => {
           addComment(comment, courseId)})}>
      Add Comment
    </button>
  )
}
Revalidating Data
Server Actions cho phép chúng ta invalidate Nextjs Cache bằng cách sử dụng revalidatePath hoặc revalidateTag.
revalidatePath: nhận vào 1 string path, tất cả các API fetches data từ path đó sẽ được revalidate.
revalidateTag: nhận vào 1 string tag. Với mỗi 1 fetch API, chúng ta có thêm tag cho nó. Khi revalidateTag thì tất cả các fetch API có tag đó sẽ được revalidate.
Ví dụ về revalidateTag:
Thêm tag vào Fetch API:
export default async function MoviesView() {
  async function getAllMovies(comment, courseId) {
    'use server'

     const jsonData = await fetch(
        "https://abc.mockapi.io/movies",
        {
          next: {
            tags: ["movies"],
          },
        }
      );

    const data: Movie[] = await jsonData.json();
  }

  return {data?.map((data: any, index: any) => {
          return (
            <div key={index} className="flex flex-col justify-start">
              <div className="h-[280px]">
                <Image
                  src={data?.thumbnail}
                  className="w-full max-h-[280px]"
                  width={data?.thumbnail_width ?? 100}
                  height={data?.thumbnail_height ?? 100}
                  alt="xxx"
                />
              </div>
              <p>{`${data?.title} - ${data?.year}`}</p>
            </div>
          );
    })}
}
revalidateTag sau khi submit form để thêm 1 movie:
'use server'

import { revalidateTag } from 'next/cache'

export default async function submit() {
  await addMovie()
  revalidateTag('movies')
}
Sau khi revalidateTag, Component MoviesView sẽ được update với dữ liệu mới nhất.
Một số câu hỏi có thể bạn sẽ thắc mắc về Server Action
- Tại sao phải dùng Server Action với Client Component, trong khi hoàn toàn có thể Fetch Data tại Client?
- Chúng ta hoàn toàn có thể Fetch Data tại Client, Tuy nhiên sử dụng Server Action sẽ tránh bị lộ API endpoint -> more secure, ít code render phía client hơn.
- Tại sao không sử dụng Route Handler mà phải dùng Server Action ?
- Nếu sử dụng Route Handler chúng ta sẽ phải tạo thêm file
Route.js|tssau đó khai báo các API như GET, PUT, POST, .., việc sử dụng Server Action sẽ code trực tiếp trong component đó sẽ thuận tiện hơn.
- Khác biệt giữa Server Actions vs Server Component là gì ?
Giống như tên của chúng, Server Actions là các actions, là async function thực thi logic code phía server
Server componet là 1 component, vừa có thể call api trong component vừa có thể trả về 1 component chứa data
Trên đây là các chức năng chính, những sự thay đổi trong nextjs 13. Còn một số cập nhật nhỏ khác mình không thể đề cập hết tại đây, các bạn có thể xem thêm tại website chính thức của Nextjs nhé !
Link: https://nextjs.org/blog